XviD Streaming Video Guide
By Tom Grandgent, 
Last updated: June 4th, 2004
Introduction
This brief guide explains how to get up and running using XviD for live, streaming video. In case you don't know
what XviD is, here's a brief summary: XviD is a video codec
(compressor and decompressor) that can reduce the vast amount of information in video to a small enough size to send in real-time over a network.
Actually, its primary use is in
movies and it's not currently tuned for very low bitrates such as
20-40kbps. But it does an excellent job at 80kbps and up as long
as it's set up correctly, which is what this guide will help you do!
Step 1: Get the latest version of XviD.
If you're not sure which version of XviD you have installed, go to
the About window for the codec and check the version number and
date. As of this writing, the latest version is 1.0 (dated May
9th, 2004) and can be downloaded from:
http://www.koepi.info/xvid.html
It's the first link on this page, under the words "Latest
Binary". This guide assumes you have this version of XviD
installed. If you have an older version of XviD installed, you
may need to uninstall that one before installing the new
version. Normally this is possible by going to the Control
Panel, Add/Remove Programs, and selecting XviD from the list.
But, if you installed it as part of a "codec pack", you may
need to uninstall the codec pack or uninstall XviD manually.
Step 2: Adjust XviD codec settings.
Go to the video codec settings in the program you're using XviD
with. I'll show a series of screenshots of the settings I use
with some explanations. If you're in a hurry and don't want to
read the explanations, just set the settings to match what you see in
the pictures, and you'll be ok. First I'll cover the main
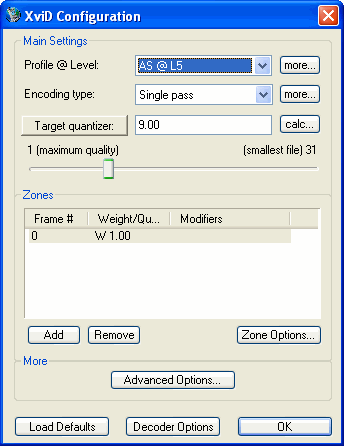
settings window:
 |
In this picture you see a button that says Target
quantizer. If you click this button, it cycles between Target
quantizer and Target bitrate. These are two different methods
of having XviD decide what the quality/space tradeoff of each
frame is.
If you're interested in a constant level of quality and don't
mind dips in the framerate (choppy motion) when the image changes
rapidly, go with Target quantizer. I've found 9 to be a good tradeoff between quality and
framerate with my 128kbps upstream connection.
If you choose Target bitrate, you can maintain a fluid
framerate at the expense of image quality, depending on what you
set the target bitrate to. I suggest choosing a bitrate
that's reasonably close to your available network bandwidth.
If you set it higher, you'll get good quality but your framerate
will suffer. If you set it lower, you'll get a good
framerate but the quality will suffer. Ok, I think you get
the point, let's move on.
Click the more... button in the
upper-right corner (to the right of Profile @ Level) to go to the
next settings window. |
 |
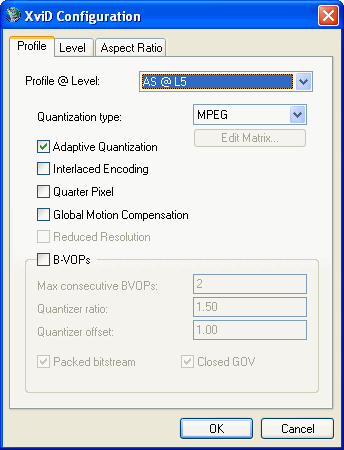
Quantization type: Choose MPEG for a
sharpened picture or H.263 for a softened picture.
This is mostly a matter of personal preference, although in theory
a softer picture contains less information and can be compressed
more easily. It can also help compensate for a noisy image.
Interlaced Encoding: Disable this. If you
actually have an interlaced video source, chances are it's going to get
deinterlaced by the time it gets to XviD. (Possible
exception: DV cams connected via IEEE1394/FireWire???)
Quarter Pixel: This increases the accuracy of motion
estimation, potentially giving better compression at the cost of
increased encoding complexity. I haven't noticed any
difference with it on though, so I suggest leaving it disabled.
Global Motion Compensation: This is for when the camera
is panning around in a movie and the whole image is sliding in
some direction. Since you're probably not going to be slowly
moving your camera around all the time, disable this.
B-VOPs: Make sure this is disabled!!!
These are bi-directional frames which use the information in later
frames to help compress earlier frames better. This does not
work at all in a low-latency streaming video scenario and can
cause crashes.
Click OK and then Advanced
Options to go to the next settings window. |
 |
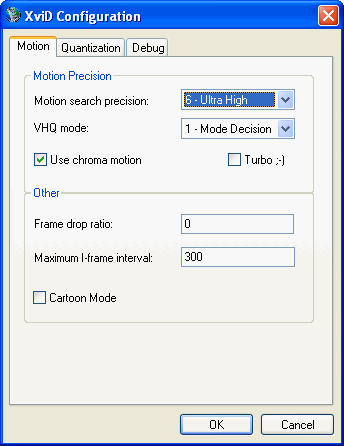
Motion search precision: I suggest using 6
- Ultra High since it increases quality a lot without costing
too much CPU time. If you have a slower CPU, perhaps under
1GHz, it MIGHT be worth lowering this.
VHQ mode: I strongly recommend using 1 - Mode
Decision since higher modes don't increase quality a whole lot
but they do cost a lot more CPU time. Even if you have a
really fast CPU, don't set this really high. It's not worth
it!
Use chroma motion: I leave this enabled. It
compresses areas of the image more heavily when they contain
content that's harder to see - for example, very dark areas.
I think this makes a lot of sense for the kind of video you get in
a streaming scenario.
Turbo ;-): Leave this disabled. All it does
is screw things up.
Click the Debug tab in the
upper-right to go to the next settings window. |
 |
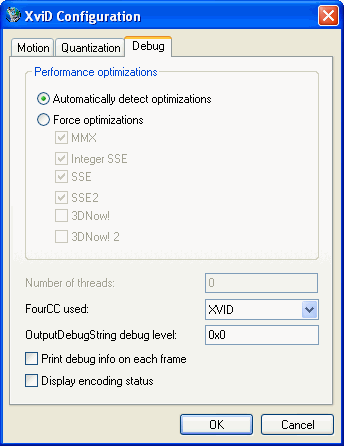
Display encoding status: If you're
interested in a detailed, behind-the-scenes look at what XviD's
doing as it's encoding, you can check this. Otherwise, leave
it disabled. |
Congratulations! If you've read this far, you're now ready to
transmit high quality streaming video in real-time over the
Internet. Enjoy, and please let me know if you have any comments
about any of these settings or your experiences with using XviD for this
purpose.
Back to the TAConf Home Page |


